Unwanted noise is a consequence of making music and recording. It comes from our own music making in the form of electrical humming and buzzing. Or, it comes from external sources as acoustic energy. Most of the time, we either ignore it or try and manage it by soundproofing rooms and keeping noise to a minimum.
But a lot of the time, this isn’t good enough. When it comes to making clean recordings, we need crisp sound coming only from our voices and instruments. Likewise, when we perform live, we also want clean sound coming from our instruments and through the PA system. By using a noise gate, we can manage excess noise.
We can use them in live situations using a pedal on the end of our effects chain, or in the studio when mixing. In this article, we will cover what noise gates are, as well as how and when to use them.
What Is A Noise Gate & What Do They Do?
A noise gate or gate is a type of audio processor that is used to control excess noise in an audio signal. Simply put, when used correctly a gate will block all unwanted noise. Noise gates come in the form of software or hardware.
When making recordings, noise from your environment and external sources accumulate and can affect the quality of your recording. Say you were recording vocals. As the vocalist goes through the motions, creating that perfect take, the microphone picks up the click track, as well as muffled noises from next door.
In this situation, you have got an almost great recording. You have captured a perfect take of the vocalist, but in that recording you have also captured what engineers call click track bleed and muffled noises from next door.
This is a perfect example of when you would use a noise gate. In effect, during the mixing stage, you insert a noise gate onto the vocal channel and adjust the settings of the noise gate to attenuate and hopefully altogether, remove the unwanted noise.
Types Of Unwanted Noise
- Room reverb
- Ambient noise
- Noise pollution from outside (traffic, people etc)
- Headphone bleed (click track and instruments coming through headphones)
- Electrical hum
- Movements of musicians when recording
- Fret buzz (on stringed instruments)
- Noisy keys (buttons) on brass instruments
- Squeaky foot pedals from kick drums and high hats
How Do Noise Gates Work & How Do You Use Them?

Using a noise gate is straightforward.
A noise gate blocks any sound/noise coming through your audio channel once you set a noise threshold. When sound sits below this threshold the gate closes, blocking any noise. When sound is louder than this threshold, the gate opens and allows the sound through.
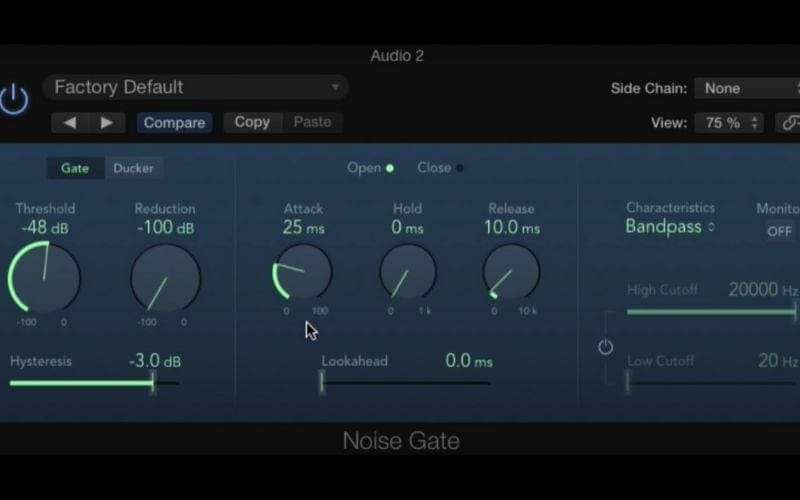
There are four common parameters on a noise gate plugin:
- Threshold – the threshold determines when a gate should open and close.
- Attack – determines how fast or slow a gate closes
- Release – determines how fast or slow a gate opens
- Hold – determines how long a gate remains (or is held) closed before it opens.
You will see these four parameters on all software. On pedals, they are usually simpler and only have one or two of these parameters. You will notice other parameters in addition to these four on different types. Some noise gates are more advanced than others, others are designed for specific purposes and some are designed according to manufacturers’ preferences. But the four parameters mentioned above are the most important and can be found on every one of these tools.
Your Noise Gate In Practice
Let’s use an example to illustrate the functionality of these four parameters.
Take the almost perfect recording of our vocalist. The vocals are flawless, but we want to use our noise gate to attenuate the click track and muffled next-door noises.
Insert the audio gate onto your vocal channel. Now, when the vocalist is singing, the noise isn’t a problem as it is masked by the loudness of the vocals. But when the singing stops, you hear the constant clicking and the occasional muffled noise. This is where you identify the loudest parts of the clicking and muffled noise and set the (opening and closing) threshold of the gate. This tells the gate to close and stay closed when the clicking and muffled noise is below the set threshold.
When the singing starts again, the sound produced will be much louder than this threshold and so the gate will open, playing the desired sound. The unwanted noise will also come through but it will be masked by the louder noise – the vocals. Only using the threshold probably isn’t enough. If it is, great. You’re done!
More often than not, you will have to make some adjustments using the attack, release and hold parameters. Start with the attack. As you know, the attack controls how fast the gate closes. So, do your best to create a fluid attack time that sounds authentic. The unit of measurement used to describe the speed of the attack – and all parameters on noise gates, in fact, is milliseconds. Now, adjust the release and hold (also measured in milliseconds) accordingly, until you get the desired effect.
There is no secret trick or formula for adjusting a noise gate. Every recorded sound and performance is different and so your noise gate parameters will be different every time.
Signal Chain: Where To Put Your Noise Gate
Ok great, you have got a sense of how to use your noise gate constructively. But where does a noise gate go in your signal chain? The real answer is that it depends on what kind of sounds your sound source is making. The most logical rule to follow is to put your noise gate directly after unwanted sounds.
Vocals
So, for vocals this might mean after an EQ, compressor and some kind of gentle modulation processing. The reason for this is that by the time the vocal signal reaches the end of this chain, incremental audio artefacts from the compressor and modulation effect might have become audible when summed together. In this case, you could add it at the end of your chain and before any reverbs or delays.
Guitar
For a heavily distorted guitar, you will want to put this tool at the beginning of your processing chain, either before or after your EQ. The reason for this is because a heavily distorted guitar picks up every finger and hand movement the guitarist makes. To maintain the perception of polished recorded sound and keep guitar riffs and licks clean, you will want to add a noise gate to block all the fumbling screeching noises.
Drums
Another example could be drums. Say you have picked up a lot of unwanted room ambience on your mics and want to minimise this ambience. Here, you could place your noise gate at the beginning of the signal chain. This way you can eliminate unnecessary sound and unwanted frequencies before you come to EQ your drums and apply the rest of your effects.
There is no real rule for where to place your noise gate in the signal. But you can think logically about what you are trying to do.If there is excess, unwanted noise coming directly from your recorded sound, insert a noise gate immediately after the audio to eliminate the noise early on in your signal. If the noise creeps up because of an accumulation of small audio artefacts, insert your noise gate into the signal chain the moment you begin to hear unwanted noise – usually somewhere near the end of your chain.
Three Tips When Using Noise Gates
Noise gates aren’t a difficult audio tool to use. It just takes a while for the proverbial penny to drop. To get comfortable with a noise gate, drag and drop some audio into your chosen DAW and start tweaking the controls. It will take you a while to develop your own techniques, so here are 3 tips to get you started.
Remove Sound Manually
Go through your audio file and delete the sounds you don’t want in your track. Obviously, you can’t delete the main parts of your recording (the performance), but you can isolate and delete any noise in the sections where there is no performance. For example, the space between guitar phrases, the gaps in vocal parts with click track bleed and external noise etc.
This is good for 3 reasons:
1. The noise gate and computer doesn’t have to work as hard to do its job – as a result you minimise the risk of computer crashes.
2. You reduce the chance of potential audio artefacts created by the noise gate (this can happen if the noise gate is forced to work really hard).
3. It will enforce the habit of keeping your audio tracks clean and tidy.
Less Is More
This goes for a lot of things in music production. Use the less is more approach when using a noise gate. If you use the parameters of a noise gate carelessly and aggressively, you end up with audio artefacts like stutters, clicks and pops as the noise gate opens and closes sporadically.
If you feel like you are pushing it, just dial everything back a bit. This way you know you are not risking audio artefacts to creep through. Being tasteful and using the less is more approach is always the best way to retain the human performance and natural sound.
Listen
This one seems obvious, but a lot of beginners get this wrong. Often, they will tweak compressors, EQs and any other effect without really listening to what’s happening to the audio.
It is very common for all producers’ first tracks to sound a bit odd because they didn’t truly listen to what was happening to the audio when mixing. When adjusting the noise gate with the attack, hold and release parameters, be very mindful of what is happening to the sound. Really listen to what’s happening.
|cta-link type=’producers’|
Final Thoughts
Don’t overcomplicate your mixes by throwing one of these on every track. It will just take you more time to mix your music, you risk creating problems if you don’t use the noise gate tastefully, and you will be using up precious computer processing power.
When using a noise gate, remember that there is no secret formula. You have to listen to what the audio is doing and adjust parameters accordingly. The insertion of your noise gate into the signal chain should be logical. Insert a noise following any unwanted noise. This way, you handle the noise effectively and avoid more audio problems along the chain. If possible, remove sound manually. Apply the ‘less is more’ technique and most importantly, listen.
Now you have learned all about noise gates, you will hopefully be utilising your new skills when producing music! Allow us to help you amplify your music, collaborate with others, and even get your music in TV, film and more. Why not try Music Gateway for free?