
What is audio compression? well, it is one of the most widely-used (and misused) techniques in modern music production. It’s a true fundamental that any beginner engineer should have in their toolbox. Alongside EQ, reverb, and delay, an audio compressor is both a building block and a powerhouse at all levels of music production.
Where Did Compression Start?
Since its birth in the late 1930s to ensure the volume of radio and TV remained consistent between broadcasts, the role of the audio compressor has drastically changed. A major uptake in the manufacture of outboard compression hardware in the 1960s, coinciding with the creation of the 4 and 8 track tape machines, meant that compressors secured their place in the music industry around the same time that copious amounts of money did.
Used by The Beatles and The Rolling Stones, Miley Cyrus, and Metallica, compression is everywhere in the music we love. It supports and shapes the sonic landscape painted by our favorite artists.
Yet, a coin has two sides.
Just as with chocolate, indulging in Netflix, and listening to Linkin Park’s ‘Numb’ on repeat, there is definitely such a thing as ‘too much of a good thing’. A much-discussed topic around audio compression, well worth some research if you’re looking to take your music industry knowledge to the next step, is the Loudness Wars.
My one-sentence synopsis: Producers, DJs, bands, and solo artists battle it out in a decades-long saga to determine the hottest track of the modern era; where hot means (probably a bit too) loud, and every hit is hotter than the last one.
There’s no question of the importance and relevance of audio compression in modern music, the extraordinary history speaks for itself. So how can you learn from the musicians that have inspired your journey, and apply the same techniques that they have used to further enhance your recordings? First, you have to understand what compression is, and how a compressor works.

What Is An Audio Compressor?
Audio Compressor is what you might assume, it squashes the sound somewhat, limiting the dynamic range, in essence making the whole signal quieter, consistently. This however means that the engineer can make the track louder as a whole (a technique called make-up gain), because there won’t be sections of increased volume that jump out quite so much.
As the age-old adage goes, a picture paints a thousand words. The below examples show the obvious effects that compression has on a waveform. Compare how the three examples look next to each other, and then listen to the associated tracks. Can you hear the differences that you see?
It should be noted that this is a very extreme example of compression, it’s unlikely you’d find something that sounded like this in a professional release. It is, however, pretty useful as a learning tool.
Listen to the compression examples here! (A: Uncompressed. B: Compressed without gain. C: Compressed with make-up gain)

How Does An Audio Compressor Work?
A compressor, whether a physical piece of outboard hardware or a plugin for your DAW (Digital Audio Workstation; the core of most modern recording studios), consists of 6 basic controls that work together to control the dynamics of a signal.
Some compressors have more advanced settings than this, but these are generally unique to the compressor. They also have more subjective results, needing trial and error to achieve success.
The Basic Controls Of An Audio Compressor
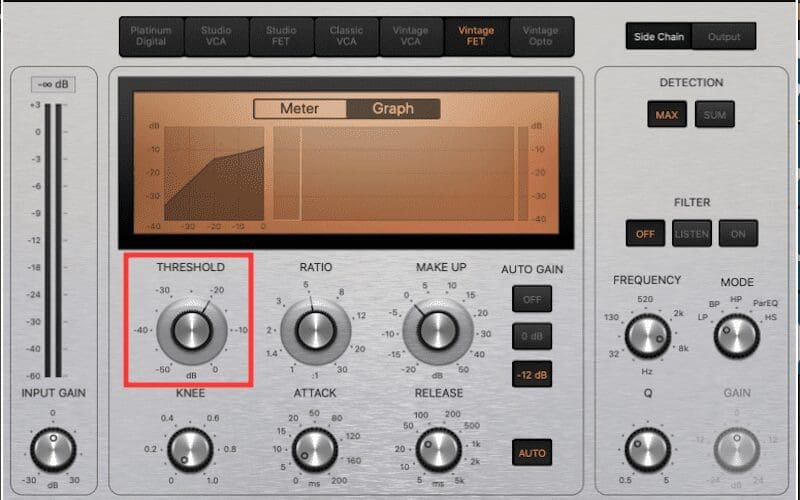
Threshold
The threshold determines at what volume the compressor “kicks in” and starts to control the dynamics of the track. We measure this in dB (Decibels).
If you’re mixing a hypothetical live performance and the vocalist gets too close to the mic, there may just be a one-second blip where the volume increases by 6dB or so. This might not seem like much, but its actually doubles the volume at which we hear the vocalist! By setting the threshold at, or slightly above, the normal level for the rest of the track, we can attenuate and reduce the increase so that it doesn’t feel as uncomfortable.
The lower the threshold, the less volume is required to make the compressor have an effect. By using this principle, you control precisely how much of the audio is compressed, as anything below the threshold will be generally unaffected by the recording compressor.
Some more complicated controls can manipulate the threshold further, making it more flexible or adjustable, but for now think of it as a rigid limit, as pictured below.
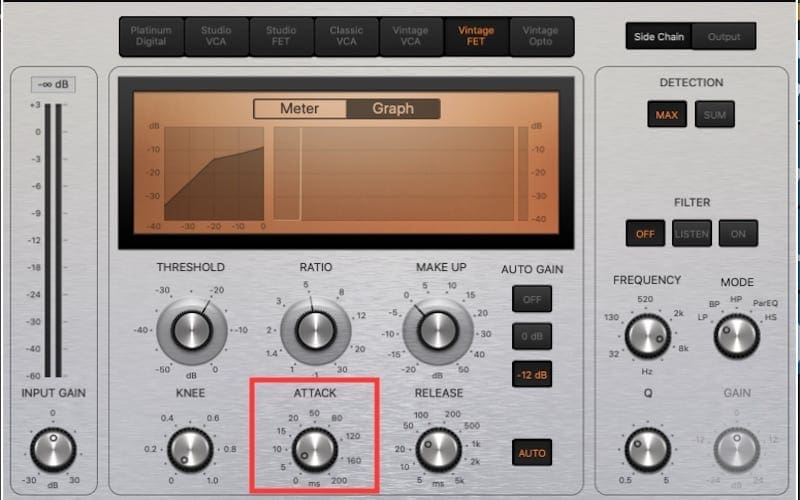
Attack
Attack controls how quickly (in milliseconds ) the compressor will apply roughly two-thirds of the gain reduction that the ratio dictates after the signal surpasses the threshold. This is key in determining how the compressor will affect the sound.
It is regarded as ‘roughly two-thirds’ because there is no industry standard for attack. However, this is considered to be a fair generalization for most compressors.
Gain reduction is the amount that the level is reduced by the compressor, and is controlled by the ratio. It is measured in dB and is explained in greater detail in the section of this article detailing the ratio.
A faster attack will mean that the compressor kicks in sooner, and could be used on tracks where the transients are too loud.
Transients are loud and short sounds, such as the hit on a snare, or strumming a guitar’s strings. Note, the sound of a guitar’s strings ringing out would not be considered part of the transient. It’s only the noticeably different, percussive sound of the strings being strummed.
By managing the transient, the initial hit sound, and reducing that in volume, we can raise the overall volume for the snare or guitar track. This means we can hear more of the room, the reverb tail, and other vital components that can get missed if the track is too quiet in the audio compressor mix.
A slower attack could, however, allow more of the transient through the compressor, and with the right balance, you can find a setting that manages the difficulties presented by the volume increases, while still getting the ‘punch’ from the tracks.
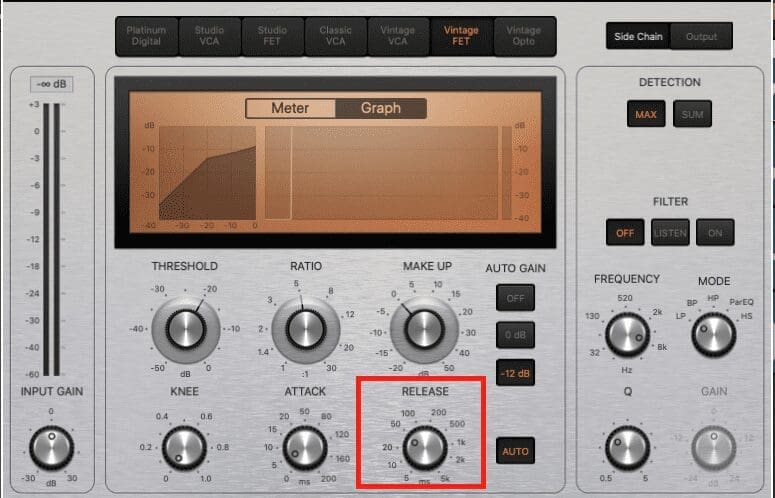
Release
The salt to attack’s pepper, release, also measured in ms, release determines how long the compressor takes to restore roughly two-thirds of the gain reduction applied by the compressor. This can be thought of as gain restoration.
Take a minute to piece together how that works in relation to the threshold and the attack. The threshold starts the process off when the audio signal’s volume goes above it. The attack then determines how long it takes after the audio passes the threshold for the compressor to begin working. The release determines how long it takes for the compressor to stop working, after the audio signal drops below the threshold.
All three of the above parameters share a key element that makes it easier to understand them as a whole. They each determine the timing of the compressor. By understanding these principles, you will know exactly when the compressor is working, so take the time to practice with your compressor plugins or outboard gear, and really get to grips with the tools that you have in front of you.
If the above three controls determine when the compressor is working, the next three determine how it works. Let’s dive into it, with potentially the most important component of a compressor.
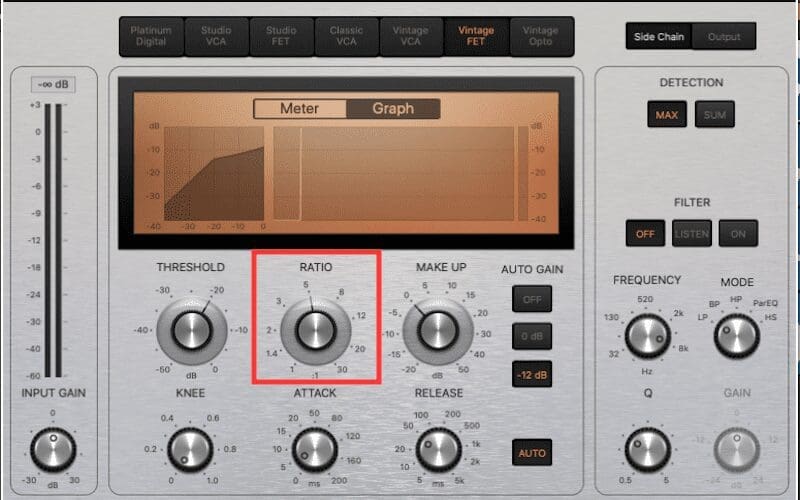
Ratio
The ratio determines by how much the sound that goes above the threshold is compressed. It is written as input: output, meaning that a ratio of 2:1 would effectively halve the volume that the signal goes above the threshold.
In real number terms (it might seem daunting that they’re negative numbers, but it’s much more realistic and will help you in the long run if you can understand it like this), if your threshold was set to -20dB, and the signal went above the threshold by 10dB, without the compressor, the signal would peak at -10db.
With the compressor active and a ratio of 2:1, the signal would peak at -15dB, a reduction of 5dB, and also 5dB above the threshold. Exactly halfway (1/2) between the threshold and the peak of the signal.
In the same audio compressor example, with the ratio set at 5:1, there would be a reduction of 8dB, and the signal would be audible at 2dB above the threshold, -18dB in this example. This is exactly one-fifth (1/5) of the way between the threshold and the peak.
Are you seeing the pattern? If we think of the ratio instead of a fraction, written as output/input, we can tell exactly how loud the signal is going to be once it is compressed. We calculate it by multiplying the ratio (as a fraction) by the difference between the threshold and the peak of the signal.
Output Levels
Using this principle, see if you can work out the output levels for all of the tracks in the below example.
You’re applying the same compressor to a few of your drum tracks. Without compression, the kick track is at -12dB, the snare is at -8dB, and the hi-hats are at -16 dB. You set your compressor to have a threshold of -20dB, and a ratio of 4:1.
Using the above information you should be able to calculate the final output levels of each of the tracks. Don’t forget that you’re working with negative numbers, so take extra care when adding or subtracting.
The answers are below this picture, and I even showed my work!
Here’s How
Let’s first work out the output level for the kick. We know that the threshold is -20dB and the kick is at -12dB, which is 8dB above the threshold, this is the difference between the threshold and the peak. By taking that value and multiplying it by 1/4, which is 4:1(the ratio) represented as a fraction, you get 2dB. This is the difference between the threshold and the peak after compression, meaning that our new output level would be -18dB, a gain reduction of 6 dB.
Applying the same rules to the snare, which is at -8dB, 12dB above the threshold, we can calculate its output level to be -17 dB. This is because 12dB x 1/4 = 3dB, so our output level after compression will be 3dB above the threshold, -20 dB.
If you didn’t get it the first time around, try again to work out the hi-hats now.
We take the output level of the track pre-compression, in this case -16dB, and work out how much more than the threshold, -20dB, it is. It’s 4dB more, which means the hi-hats are 4dB louder than the threshold setting. We take that 4dB and multiply it by 1/4 (the same as dividing by 4) to get 1 dB. So with compression, our hi-hats will be 1dB above the threshold and will have an output level of -19 dB.
Even if you didn’t quite follow all of the maths in that, you should be beginning to understand the way that ratio controls how much a compressor is affecting a sound signal.
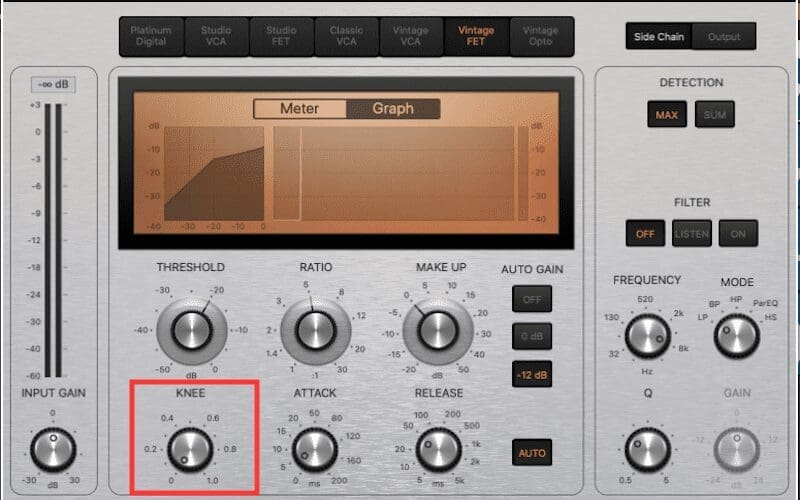
Knee

No, not your Grandma’s dodgy joints, I promise we’re still talking about compressors!
The knee works alongside the threshold and the ratio to determine exactly how much of a signal is compressed and by what amount. It gives you more control over a track’s volume level, without having to use multiple compressors to deal with different things.
For example, you might want light compression on your guitar track to give it some more ‘weight’, but there’s also a section with some aggressive strumming that gets in the way of the vocals. By using the knee to manage the other parameters, you can achieve harder compression (with a higher ratio) on louder parts than you have on the quieter parts, where softer compression is more appropriate.
Examples Of Knee
Let’s take an example to help figure out what this means, and potentially think of some ways that knowing how to use this tool can benefit you.
If the compressor has a threshold of -20dB and the knee is set to 10dB, this means that it will gradually increase the compressor ratio between the points of 10dB on either side of the threshold. If the ratio was set at 4:1 in this scenario then with the signal at -30dB it would be uncompressed (1:1), then slightly compressed at -20dB (2:1), and finally fully compressed at -10 dB (4:1).
When you gradually increase compression like this, it is called a soft knee. A hard knee would be a lower numerical value (such as 1dB), and if we applied that knee to the above example, we would be at 1:1 at -21dB, 2:1 at -20dB, and 4:1 at -19 dB.
Now that you’re up to scratch with the way the knee control works on a compressor, see if you can think of some examples where it could come in handy.
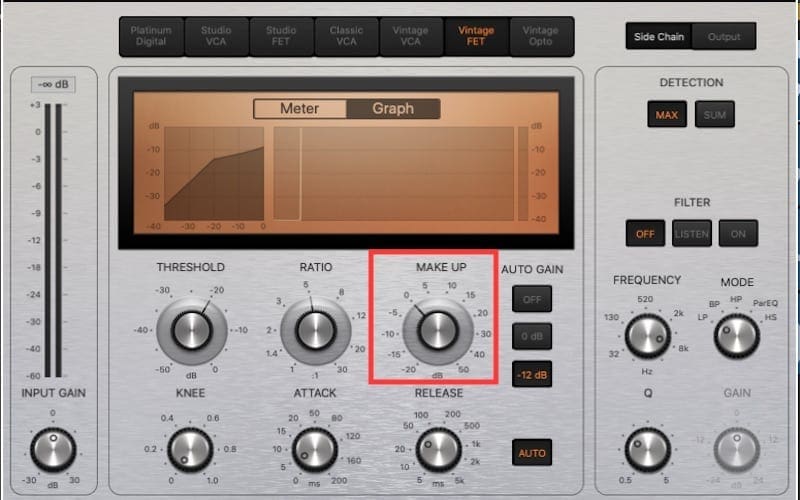
Make-up Gain
We’ve saved the simplest control until the last! The make-up gain control is designed to return the compressed track to the right volume after compression has taken place. However, don’t forget that you can be liberal and creative in every setting!
This is how you ensure that your guitar tracks are consistent, your vocals are creamy and your drums are punchy. Use the compressor to get a more level volume throughout the track, then use make-up gain to increase the overall volume.
Remember Everything You’ve Learned So Far About Audio Compressors?
Let’s go over everything quickly to make sure that it’s stuck.
The threshold determines how loud the signal has to be for the compressor to kick in, while the attack determines how long it takes after the signal passes above the threshold for the compressor to start working. The release dictates how long after the signal passes below the threshold for the compressor to stop working.
The ratio determines how much the signal is compressed. The knee determines the rate of compression when it is applied and in what amount. The makeup gain simply increases or decreases the volume of the compressed audio.
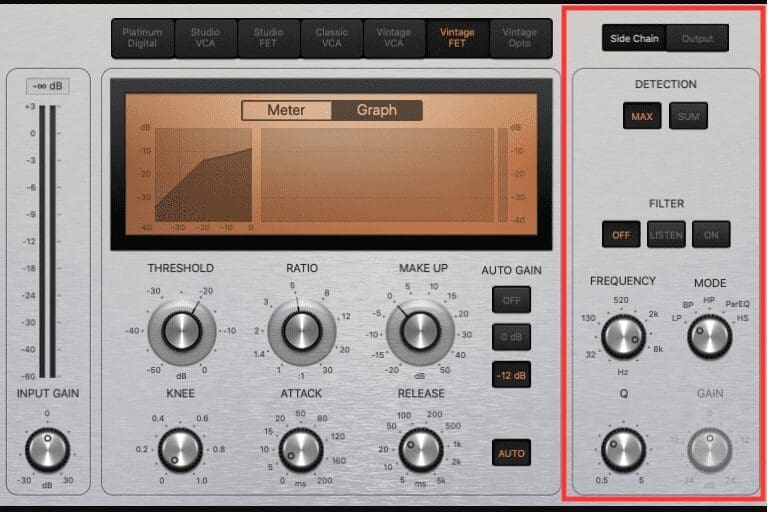
Additional Controls – Advanced Compression
You may find that your compressor plugin or outboard gear has additional settings, above and beyond the ones listed above. These can manipulate the compressor further, changing the overall sound greatly, and often allow for more creativity or clarity in your mixing. Most of these will be unique to your specific compressor or will be fairly self-explanatory (things like ‘Punch’ or ‘Distortion’). However, you’ll likely find one of these additional controls on most compressors, so it definitely deserves talking about.
Sidechain Compression
Sidechain compression allows you to manipulate the volume of one track based off of another track’s level.
One of the most common reasons for using this technique would be to manage the low-frequency instruments on a track, such as how the kick drum and bass (guitar/synth) work together.
In general, unless you just want a messy disappointment in your low end (and who would?), you need to create space for the kick drum on the bass track. The reason that people often do it this way is that the kick drum is often the core of the groove. It should be heard and felt consistently.
By setting a compressor on the bass track, and using the sidechain tool to link it to the kick drum, you can make it so that the kick causes the bass to reduce in volume. This means that the kick will punch through every time.
It may seem extreme to drop one instrument out to make room for another one, yet after some careful manipulation (use your ears!), you can achieve this technique so that it is unnoticeable to an untrained ear. Also keep in mind that in this example, the kick drum and bass are both notable powerhouses on a song, so they do need to be controlled in relation to each other.
Remember, as with everything in music production, the focus is on the music. Make sure that what you’re doing is benefiting the sounds and overall feel of whatever you’re making, and think of tools like compression and EQ as exactly that, tools. They are to be used to make the art, but they are rarely the art itself.
Some Tips On Audio Compression
Still, keeping up?
Compression is confusing, there’s no getting around the fact. It requires such a steep learning curve at the start that many give up or ignores it in general. Unfortunately, these are often the producers and artists that we as consumers give up on.
Everyone knows that to make it in the music industry you normally have to have tenacity, determination, and skills, or at least buckets and buckets of money. Let’s assume you can’t go down the financial route.
By learning and using compression regularly in the right ways in your tracks, alongside other fundamentals of music production, you will rapidly grow into a producer with a reputation for consistency and quality.
Take a look at the presets available in your compressor plugin, and see how they recommend treating certain instruments. From there, you can adjust the compressor so that it creates the sound that you’re looking for.
If you’re consistently making the same adjustments to presets or setting up your compressor from scratch the same way quite often, why not make your own presets? You can normally save a setting as it is, directly into the plugin itself, and then you’ll be able to load the preset up on any other channel or in a different project completely, and achieve fantastic results almost immediately!

Applied Examples – Some Great Audio Compressors And Resources
If you’re just starting out with compression, or have been using it for a while but not fully understanding what you’re doing, there isn’t much point in spending hours and hours looking for a great compressor. If this sounds like you, just use the standard compressor plugin that comes with your DAW for now. Then really build the skills to a point where you feel confident in your abilities.
Once you’ve reached a point where you know how audio compression works, what kind of compression you like to apply, and the effects you’re hoping to achieve, you can begin looking for a more specialized compressor that suits your needs.
Examples Of Audio Compressors
I could spend another 2000 words writing about all of the fantastic compressors available on the internet, but instead, I’m going to highlight some great resources that already exist on the topic.
For a slightly more in-depth look at compression, and some reinforcement on what we’ve covered here, check out Cymatics’ downloadable PDF on compression here. It’s a great resource and absolutely free!
If you’re into books, try and get your hands on The Mixing Engineer’s Handbook by Bobby Owsinski. A fantastic resource that covers everything you need to know about mixing. This is a professional-level resource, that you could use for references in a music production degree. Instead of going to Amazon, why not contact your local bookstore and see if they can help you out? They would love the business and support from their community, and they probably pay their taxes too!
If you’re just interested in getting your hands on compressor plugins, check out Sage Audio. They have a list offering examples of plugins. Well worth a read, it covers a plethora of fine compressor plugins that can enrich and enhance your productions.
More of a hands-on kinda engineer? You can get properly stuck in with this list of outboard compression units. Covering all kinds of compressors, from Tube to FET, this list by Ask Audio should satiate your tech appetite.

Final Thoughts On Audio Compressors & Compression
By now you should be confident in the role that audio compressors play in music production and their capabilities both as a necessary tool and as a creative facility.
Remember that compression is incredibly powerful, and has the capability to completely change the dynamics of a track, quite literally. As you begin to introduce it to your productions, take care to be aware of the changes that it is making, and ensure that you remain in control.