
If you’re a music producer wanting your first home recording studio setup, or maybe wanting something better ergonomically or for speed and CPU performance than your tired old computer for music production, why not build your own desktop computer? That way, you can ensure you have the best computer for music production!
In this article, I will give guidance and a strategy for a music production PC build. This should save you money and help you build a cheap PC for music production that will work well with your DAW.
I will also provide two lists. These will have the components you can go with for building a solid system including the best CPU for music production that will be upgradeable going forward.
Why Should You Build A Computer Yourself?
There is a key difference between the power you can enhance with a laptop vs desktop computer and/or Mac or PC. You will also likely save money instead of being stuck with an off-the-shelf system that can’t be upgraded.
There are various cheap PCs for music production, and popular brands that make the best computers for music production are Acer Aspire, Dell Inspiron, NVidia, AMD & Intel Core.
But… let’s explore building your own!
Common fears are that this is too complicated or that you might break something. I want to encourage you regardless – as long as you are patient and careful, It’s not rocket science! Be sure to use little force when inserting the CPU, to also read up elsewhere and educate yourself on the basics. Be patient and ask questions in the online forums if you’re really confused about something.
If you follow these tips, you’ll do just fine. So, why not give it a shot and put together something customised for your personal needs which also costs significantly less than pre-built computers? Here’s what you need to know to get started.
What To Buy
It will seem like a lot to learn when trying to build the best computer for music production if you’re not familiar with computer hardware. However, it’s pretty simple to get all the pieces and put them together without too much trouble – with a little patience at least.
You should research and choose your components in something of a particular order, however, which is reflected below. Namely, the motherboard should be chosen first as it affects everything else.
Motherboard
The motherboard is the base, so go high quality onto this part which all the other components fit. Think of it as the infrastructure by which information travels between all the other components. The motherboard is the most critical component because it determines the socket type and speed range (and thus future-proofing) of the CPU and RAM you can use in your system as well as other things.
I highly recommend either ASUS or Gigabyte motherboards, as they have consistently been making quality motherboards for a long time. I have used them both without issue over the past 20 years. There are other brands out there worth checking out, but you can’t go wrong with this two quality-wise, and they both make a wide variety of boards for different price ranges.
Form Factor
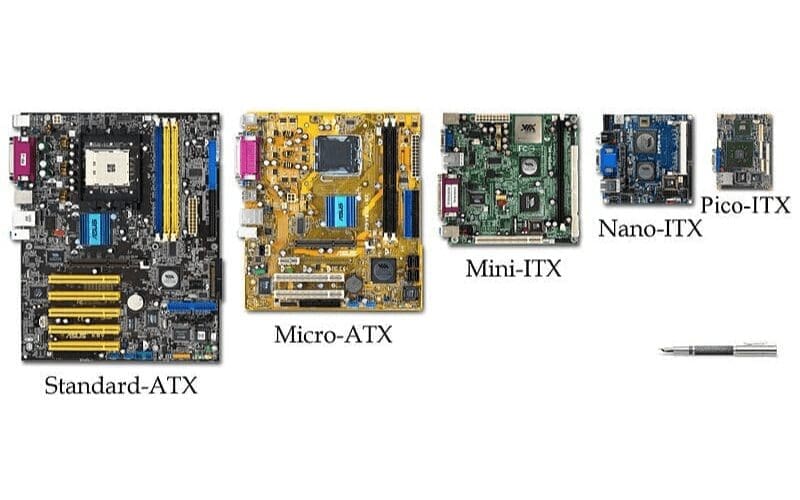
There are three main form factors for motherboards: ATX, micro ATX and mini ITX. I recommend ATX or micro ATX because mini ITX is quite small, and while it might be cheaper, it runs the risk of overheating and there are no benefits to this unless you really don’t have the space for a standard computer case.
Not to mention mini ITX tends to have only 2 RAM slots, which means it’s more expensive to add RAM as a later upgrade. This is because you’ll likely have to take out whatever you already have and replace it with more expensive sticks. I’ll cover more about RAM in a bit.
There are several form factors but most are impractical for music production and geared for other usages.
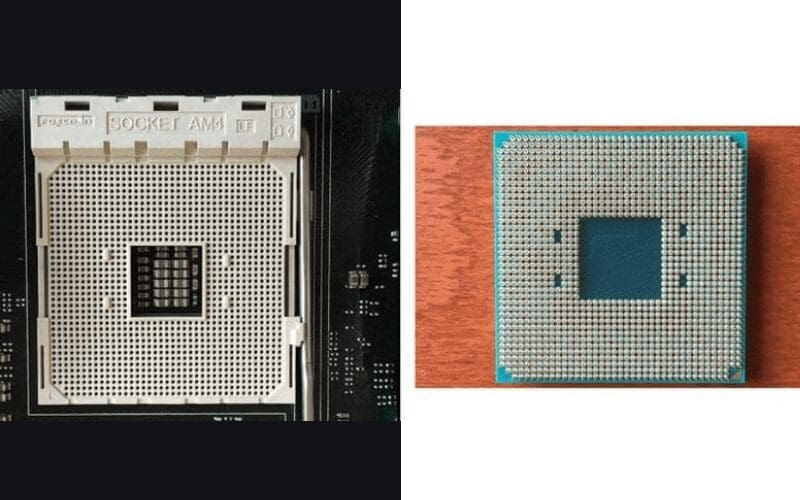
Socket Type
These have changed a lot over the years, though things are starting to slow down due to Moore’s Law. There is a handy table in this article which shows all of the AMD and Intel socket types.
Click on Computer Type at the top of the table to sort it and look at the Desktop sockets, focusing on the most recent Intel and AMD socket types as shown by the date at the left. For AMD AM4 is the current socket and for Intel, it’s LGA 1151/socket H4.
CPU
AMD Vs Intel
Personally, I’ve always bought AMD because they cost less and I’ve never had any trouble with them. For music production (or anything, really) I don’t see the added benefits of the extra cost and it has always felt like the exorbitant of branding more than anything else.
One last thing to note if money’s tight is that it’s possible to buy the cheapest CPU your new motherboard will take and, in a year, upgrade to the best CPU it will take. Usually, the prices change a lot over that time, and it might not cost you much more than buying the more-expensive one up-front. Just be sure you know what you’re committing to with the cheapest CPU in terms of performance. It shouldn’t be a problem if you record external sources, but it might impact you more so with internal, sampled instruments and at mixing time.
As for processor speed, I recommend nothing less than 3.0 GHz, and as many cores as you can afford. AMD Ryzen is good. The apple mac Intel core i5 or i7 processor (again, for LGA 1151 socket) should also work – but stay away from i3 unless you’re planning the later upgrade.
Fans
Most CPUs come with a fan, but consider upgrading because the CPU is the single most expensive, important and likely-to-overheat-and-die-because-of-it component in your computer. Liquid cooling is appealing because it works well and is quiet compared to a fan, which is great for recording.
That said, my liquid cooler pump died after less than 3 years, whereas my CPU fans have never kicked the bucket. The cheapest liquid coolers cost about $50, whereas a decent fan may cost around $20 – $30. You can get a fan for a lot more than that, but there’s no reason to do so.
Just be sure (whatever fan you look at for the CPU or for your case) to compare noise level ratings and look for a good balance between airflow and noise level.
RAM
There are different types of RAM, including DDR2, DDR3 and DDR4, which are incompatible with each other. You can’t use one stick of DDR2 with one stick of DDR3. All sticks have to be of the same type. There is a further level of detail as well. Some DDR3 (or DDR4 for that matter) is faster than others and go from 2GB, 4GB, 8GB of ram and 16GB.
The prices, if nothing else, will guide you here. Just know that you might as well buy two of the same speed because you’re only going to go at the slower of the two speeds otherwise. I recommend using the same brand and a matched set of RAM, where all the specs on each stick are identical. In fact, RAM is often sold in pairs this way, so it’s relatively easy. Otherwise, you may run into compatibility issues which affect the stability of your system.
RAM is different to other components listed here, as it’s the easiest and cheapest component to upgrade. Also in a laptop, it is the only component you can upgrade, so lots of brick-and-mortar stores have been stocking it for years.
Keep an eye out whenever you’re out and about, and look at what’s on offer in terms of price, brand and all the specs you can remember or write down. A little research ahead of time will pay dividends in getting the best deal later if you’re patient and persistent with RAM and all of your other component purchases.

Hard Drive(s)
There are two main types of hard drives: HDD (hard disk drive) and SSD (solid state drive). HDDs are cheaper and, being mechanical, much more prone to failure. However, they’re all that we had for a long time, so don’t let that put fear in you.
SSDs are highly-reliable and very fast for certain types of actions, particularly when your OS (Windows) boots up or causes you problems.
There are SSDs that connect traditionally via cable to your motherboard, but there are also SSDs that connect like a soundcard or other peripheral into one of the card slots on your motherboard. There are also external HDDs and SSDs.
What I did, and what I recommend you do, is have one relatively small internal SSD, one internal HDD and one external HDD (if your budget allows it, of course).
Soundcard, Case & PSU
Since you’re trying to build the best computer for music production, you’ll be getting an external USB audio interface like the ones made by Focusrite and Presonus, so your internal soundcard is a secondary consideration.
Your motherboard will likely have both onboard video and sound, and that may be enough for you. If your motherboard doesn’t have that (unlikely), it’s okay not to get a soundcard at all to save money. Your external audio interface will have both a headphone jack and outputs for your powered monitors.
I ended up eventually getting a Soundblaster Z on sale a few years ago because it’s ASIO-compliant, and has a bit of shielding and gold-plated inputs. It’s nothing too fancy and it has lots of annoying ‘audio-enhancing’ features I need to make sure are disabled, but it’s better than the onboard sound for listening to my mixes on my computer’s speakers and it helps with latency. When buying a computer case, make sure it has plenty of places to mount fans and bonus points if those places are on top since heat rises, though side vents are great too.
Your trade-off will be heat-for-noise, but you can get very quiet fans. What you don’t want to do is go with only a fan or two in order to have the most-quiet recording environment. Sure, a dead computer is quiet, but it’s not recording anything.
I recommend buying a PSU last, as once you’ve decided on the rest of your components, or at least narrowed it down, you can get an idea of your power consumption needs and allow for future upgrades. Use this handy power supply calculator to get a ballpark estimate of what wattage range you’ll need. Just don’t skimp on this component money-wise or wattage-wise, as either can cause all sorts of weird, difficult-to-diagnose issues if your power supply is shoddy but still limping along.
Buying Tips
A general strategy to apply, which I’ve touched on already, is to think in terms of the price being weighed against future-proofing. Lower prices go with older technologies, but you’ll then have to buy new components sooner in the future. Newer components can theoretically be upgraded, particularly where the CPU is concerned.
Consider this as you do your research and start putting together lists of parts with perhaps two sets of options: low and medium-priced, both upgradeable.
Buy New Or Used?

I don’t recommend buying internal electronic components used or refurbished unless they come with a great warranty and you have the time or a backup computer if it goes down for a week or two while a new part is being shipped to you. Generally, electronics are fickle and fragile, warranties are limited and repair quality is of high variability. Buy your internal components new.
That said, I prefer to buy used audio interfaces or other external gear which is sold as a single unit without easily-accessible internal parts. I save significantly doing so on eBay, Reverb, at a local pawn shop, garage sale, swap meet, Craigslist, etc.
Just be sure to communicate clearly about the terms of sale and ask about returns, shipping, delivery, and warranty. Check whether they’ve had any trouble with it before, or had repairs if these things are not already clear. Trust sellers who clearly communicate all of this upfront more than those that don’t. They may just be lazy, or they might be hiding something in order to make a sale. Be cautious but look for savings.
Again, whatever you choose to buy used, patience is key here. Take your time and start perusing the online auctions early and frequently, as well as local sources of used gear and parts. You might find some really good deals! Don’t forget about things like multi-card readers, network and audio cables, cheap speakers for listening back to mixes. You never know where you’ll find all these secondary things until you see them in front of you, so keep a list.
Where To Buy

I recommend Newegg, Frys or Amazon. I also recommend waiting until there is a sale. If you have a big computer parts store within driving distance, I highly recommend going there a few times to see what they have – but be sure to check online. I’ve almost always found better deals online.
That said, some of the brick-and-mortar stores have a lot of knowledgeable people (at least at the places I’ve gone to), and tons of secondary parts you might not realise you need until you’re in the middle of putting your computer together. Just be wary of salespeople that have learned to sound confident when speaking on things about which they know next to nothing.
How To Put It Together
First of all, read your motherboard manual. There may be something unusual about your motherboard that you’ll need to take into account, and this is how you find out. Be aware of any jumper pins, what they do, what they’re defaulted to and what the manual recommends they be set to.
Don’t forget to connect the power switch and HDD light cables from the case to the motherboard. Also, note the locations of the CPU socket, SATA connectors (for hard drives), RAM slots, and peripheral card slots as well as any USB and any other useful connectors.
ESD Protection
ESD stands for electrostatic discharge. It’s the thing that shocks you when you touch metal after walking on a carpet in socks in the winter. I care about safety regarding ESD and I recommend getting an ESD wrist strap and grounding yourself when handling computer components.
Also, don’t use a power tool in this process, at all. I mean, why take the risk? As far as other tools go, get a screwdriver with changeable heads (bonus points if the heads are magnetic). A small flashlight or good lighting might also help. That’s really all you need besides the willingness to take it slowly.
RAM
Make sure to do your research on assembling the parts of your computer without breaking them. This is not the time to wing it, especially where expensive, fragile parts are concerned. Be particularly careful when putting your CPU in its socket on the motherboard. The pins bend very easily, and if that happens, it may never fit and you’ll be out of pocket.
For the most part, very little force is needed to put everything together. RAM is the one exception, however, as it needs to snap into place. Just be sure not to crack the motherboard. You want to have enough pin risers underneath the motherboard connecting it to your case so that the motherboard doesn’t flex too much when you are inserting RAM sticks.
All motherboards and computer cases come with hardware for mounting the motherboard to the case, and there should be risers which screw into the case. There will then be washers which isolate the motherboard from the case and screws which attach the motherboard to the riser. Put a riser everywhere the motherboard has a mounting hole. Be conscious and smart about what you’re doing, and ask questions when you’re unsure!
Repeat After Me: Zero-Force Insertion On The CPU
There is a marker on one corner of the CPU which needs to be matched up with an identification marker on the motherboard’s CPU socket. When these are lined up, the CPU is turned the right way. This is the only way it will go into the socket.
It should literally drop into place like a peg falling into a hole. Only after this has happened should you lower the retaining lever arm (again, zero force) to hold it in place, apply some heat-sink paste and attach your CPU fan with its retaining arm bar or similar apparatus.
I can’t stress enough that the CPU is the most fragile component you’ll be working with. So, when it comes to putting the CPU in, I recommend doing this first after mounting your motherboard into your case. Do it very carefully and slowly, and don’t forget to attach the fan on top of it and plug the fan into your motherboard. It takes no force besides that of gravity to insert the CPU into its socket, which is good because the pins on the bottom of the CPU bend very easily. Be warned!
Setting Up Your Hard Drives
If you took my advice and got an SSD, you’ll install Windows on it. Make sure to verify that your SSD is indeed the C: drive, that Windows will be installed on it and that your other drives won’t be used for Windows at all. This is important for when Windows starts playing up so that it doesn’t take out your music data with it.
You could disconnect all other drives before installing Windows, then after it’s complete, reconnect the other drive(s). Make sure the SSD is connected to the first SATA port on the motherboard, which will be labelled in very tiny letters (SATA 0 or sometimes SATA 1 – the lowest number) and should also be easy to find in your motherboard manual’s layout diagram.
After installing Windows and reconnecting the remaining drives, you’ll want to format those drives. Google it. It’s easy to do, but just give partitioning some forethought as once it’s done and your data is on it, it’s not easy and somewhat dangerous to try to change later. I kept one partition for music production and one for everything else and later, after getting a second internal HDD, one drive for each.
Then, you should connect an external drive for backups. If you work with others and travel to do so, you may want to reverse the usage of the internal and external HDDs, putting your music production on the external drive so that you can take your files with you to work from anywhere. If you can afford it, an SSD would be better for this, since it has no moving parts and is less susceptible to shocks from bumping or dropping.
Be sure to do your research on optimising Windows generally and also specifically for music production. This can be done once you start working with your new computer because things like latency won’t be known until you begin testing your system in production.
Step-By-Step Installation
- Ground yourself with an ESD wrist-strap
- Mount your power supply into your case
- Then, mount all case fans into the case
- Mount the motherboard into the case and connect the ATX power cable from the power supply to the motherboard and connect the case fan power cables to the motherboard
- Put the CPU into the motherboard socket (no force needed) and lower the socket’s retaining arm
- Put a small amount of thermal paste on top of the CPU and attach the CPU fan to the CPU
- Attach the CPU fan power cable to the motherboard
- Insert the RAM stick(s). Force is okay here, but check the notch at the bottom of the stick and make sure it aligns with the tab in the motherboard slot. They only go one way! Also, make sure you’re not bending the motherboard
- Mount the hard drives and attach cables between them and the motherboard, being sure to connect your SSD to the first SATA socket
- Install your sound card and any other PCIe cards into slots, and secure them to the side of the case with screws. Connect any necessary cables (audio cable for the sound card, power cable for video cards, etc.)
To Overclock Or Not To Overclock
Overclocking is the process of pushing hardware past its officially-rated speed. It’s perhaps too easy to do. It is accessible through the motherboard’s BIOS, but it’s not really necessary for music production, at least not for those just starting out. Overclocked hardware tends to overheat.
This either ruins it or makes it age more quickly. So, it simply requires more cooling power to do it right. You should use liquid cooling if you want to overclock. I used liquid cooling for about 2 or 3 years, but then the pump failed. This didn’t cause any damage as the computer recognised elevated temperatures right away and shut itself down. That was what told me the pump had failed.
There’s no real need to overclock with music production, as any inability to run more software plug-ins will quickly be offset by increased instability, and you risk losing what you’re working on, or the flow of your session. That said, for some people, part of the fun of building your own system is getting more out of your music production hardware, so it’s a subject unto itself and requires further study.
Best Computer For Music Production: Tight Budget Build
Hopefully, you now have a basic understanding of all the components that make up a desktop PC, and feel more confident about building your own without being easy prey for unscrupulous salespeople. I’m now going to present a couple of lists of hardware gathered from the current offerings at Newegg. This will give you a couple of places to start budget- and choice-wise in deciding what to buy.
This is essentially the cheapest I would go without starting to seriously compromise on the performance and quality of components. If you need to go cheaper, wait for the next Black Friday or another big sale.
- 3.5 GHz AMD Ryzen 3 CPU
- 8 GB DDR4 RAM
- 240 GB SSD
- 1 TB HDD
- 23” Viewsonic Monitor (Refurbished)
Motherboard
GIGABYTE B450M DS3H AM4 AMD B450 SATA 6Gb/s USB 3.1 HDMI Micro ATX AMD Motherboard
$73
CPU
AMD RYZEN 3 2200G Quad-Core 3.5 GHz (3.7 GHz Turbo) Socket AM4 65W YD2200C5FBBOX Desktop Processor
$100
RAM
G.SKILL Aegis 8GB 288-Pin DDR4 SDRAM DDR4 2666 (PC4 21300) Desktop Memory Model F4-2666C19S-8GIS
$48
Hard Drives (OS, Data):
Kingston A400 2.5″ 240GB SATA III TLC Internal Solid State Drive (SSD) SA400S37/240G
$37
Seagate BarraCuda ST1000DM010 1TB 7200 RPM 64MB Cache SATA 6.0Gb/s 3.5″ Hard Drive Bare Drive – OEM
$45
Case
Antec Value Solution Series VSK3000 Elite, Black SGCC Micro ATX Tower Computer Case, Support up to 6 Drive Bays, Support Graphic card length up tp 335mm
$39
Case Fans
ENERMAX TB SILENCE UCTB12 120mm Case Fan
$8.53 x 2 = $17.06
Power Supply
CORSAIR CX Series CX450 450W ATX12V 80 PLUS BRONZE Certified Active PFC Power Supply
$40
Sound Card
Optional
Monitor
ViewSonic VP2365wb Black 23″ IPS LCD Monitor with VGA & power cables
$60
Total: $459.06
Best Computer For Music Production: A Healthy Budget Build
This build will get you a middle-of-the-road CPU in terms of speed for the current generation of AMD processors, quiet case fans and no-frills. You might get by with fewer fans but if your workspace is hot and especially if you produce entirely in the box, I wouldn’t change it.
- 3.5 GHz 4-core AMD Ryzen 5 CPU
- 16 GB DDR4 RAM240 GB SSD
- 2 TB HDD
- 27” Viewsonic Monitor
Motherboard
ASUS ROG STRIX B350-F GAMING AM4 AMD B350 SATA 6Gb/s USB 3.1 HDMI ATX AMD Motherboard
$117
CPU
AMD RYZEN 5 1500X 4-Core 3.5 GHz (3.7 GHz Turbo) Socket AM4 65W YD150XBBAEBOX Desktop Processor
$145
RAM
G.SKILL FORTIS Series 16GB (2 x 8GB) 288-Pin DDR4 SDRAM DDR4 2400 (PC4 19200) AMD X370 / B350 / A320 Memory (Desktop Memory) Model F4-2400C15D-16GFT
$87
Hard Drives (OS, Data)
Kingston A400 2.5″ 240GB SATA III TLC Internal Solid State Drive (SSD) SA400S37/240G
$37
Seagate BarraCuda ST2000DM006 2TB 7200 RPM 64MB Cache SATA 6.0Gb/s 3.5″ Hard Drive Bare Drive
$60
Case
Antec Performance Series P7 Window Red, Mid Tower Computer Case, 2 x USB ports 3.0, Side Window Panel, Support up to 6 Drive Bays, Relocatable/removable 3.5″ HDD cage
$45
Case Fans
ENERMAX TB SILENCE UCTB12 120mm Case Fan
Cooler Master Sleeve Bearing 140mm Silent Fan for Computer Cases and Radiators
$9.00 x 3 + $11.00 x 2 = $49.00
Power Supply
CORSAIR CX Series CX450 450W ATX12V 80 PLUS BRONZE Certified Active PFC Power Supply link
$40
Sound Card (Optional)
Creative Sound Blaster Z PCIe 116dB SNR Gaming Sound Card with 600 ohm Headphone Amp and Beamforming Microphone
$95
Monitor
ViewSonic VA2746m-LED Black 27″ 3ms Full HD 1080P TN Widescreen LED Backlit Monitor, 1200:1, 300cd/m2, VGA&DVI-D, Built-in Speakers
$157
Total: $832
Conclusion
Hopefully, you feel more confident building the best computer for music production! You could spend a lot more money than the second build, but you’d see diminishing returns. Your specific needs will come to light over time, so you might as well save the extra money for when needed or much-wanted upgrades make themselves clearly known.
Additionally, you will probably want to get an external drive (approx. $100) as a backup and/or another internal drive and/or cloud storage for this same purpose.
Subscription prices vary but require fairly-fast internet. The options here are so I have omitted them for the sake of brevity and simplicity. You may also want to look into soundproofing your home studio once your killer computer is ready.
Happy hunting and I hope you enjoy building your first PC. May you make many killer tracks with it and spend that money you saved on something inspiring!
What is a Driftmaker VST? Click here to find out more.